Adding new DataNode to the cluster using Ambari

I am going to add one DataNode to my existing cluster. This is going to be done in Ambari. My Hadoop ditribution is Hortonworks.

Work on the node

Adding new node to the cluster affects all the existing nodes – they should know about the new node and the new node should know about the existing nodes. In this case, I am using /etc/hosts to keep nodes “acquainted” with each other.

My only source of truth for /etc/hosts is on Ambari server. From there I run scripts that update the /etc/hosts file on other nodes.

  1.  Open the file.
    sudo vi /etc/hosts
  2. Add a new line to it and save the file. In Ubuntu, this takes immediate effect.

    10.0.XXX.XX     t-datanode02.domain       t-datanode02

  3. Running the script to update the cluster.
    As per now, I have one line per node in the script, as shown below. it is on my to-do list to create a loop that would read from original /etc/hosts and update the cluster.
    So the following line is added to the existing lines in the script.

    cat /etc/hosts | ssh ubuntu@t-datanode02 -i /home/ubuntu/.ssh/key "sudo sh -c 'cat > /etc/hosts'";
  4. Updating the system on the new node
    I tend to run this from Ambari. If multiple nodes are added, I run a script.

    ssh -i /home/ubuntu/.ssh/key ubuntu@t-datanode02 'sudo apt-get update -y && sudo apt-get upgrade -y'
  5. Adjusting maximum number of open files and processes.
    Since this is a DataNode we are adding, number of open files and processes has to be adjusted.
    Open the limits.conf file on the node.

    sudo vi /etc/security/limits.conf
  6. Add the following two lines at the end of the file

    *                –       nofile          32768
    *                –       nproc           65536

  7. Save the file, exit the CLI and log in again.
  8. The changes can be seen by typing the following command.
    ulimit -a

    Output is the following:

    core file size          (blocks, -c) 0
    data seg size           (kbytes, -d) unlimited
    scheduling priority             (-e) 0
    file size               (blocks, -f) unlimited
    pending signals                 (-i) 257202
    max locked memory       (kbytes, -l) 64
    max memory size         (kbytes, -m) unlimited
    open files                      (-n) 32768
    pipe size            (512 bytes, -p) 8
    POSIX message queues     (bytes, -q) 819200
    real-time priority              (-r) 0
    stack size              (kbytes, -s) 8192
    cpu time               (seconds, -t) unlimited
    max user processes              (-u) 65536
    virtual memory          (kbytes, -v) unlimited
    file locks                      (-x) unlimited

Work from Ambari

  1. Log in to Ambari, click on Hosts and choose Add New Hosts from the Actions menu.
    ambari-add-new-host
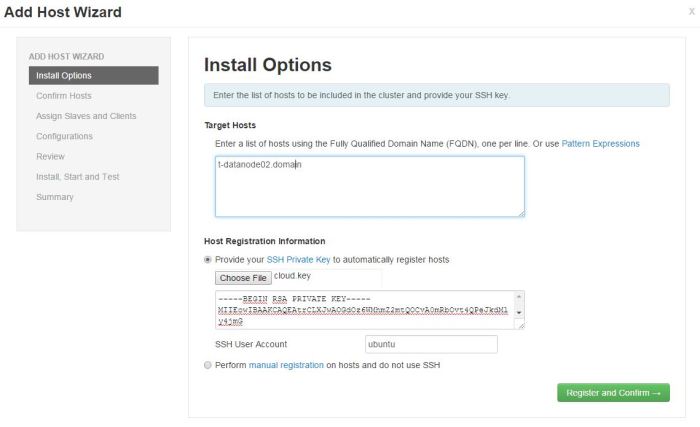
  2. In step Install Options, add the node that is soon to become a DataNode.
    Hortonworks warns against using anything than FQDN as Target Hosts!

    If multiple nodes are added in this step, they can be written one per line. If there is a numerical pattern in the names of the nodes , Pattern Expressions can be used.
    Example nodes:
    datanode01
    datanode02
    datanode03
    Writing this in one line with Pattern Expressions:
    datanode[01-03]
    Worry not, Ambari will ask you to confirm the host names if you have used Pattern Expressions:ambari-pattern-expression-example
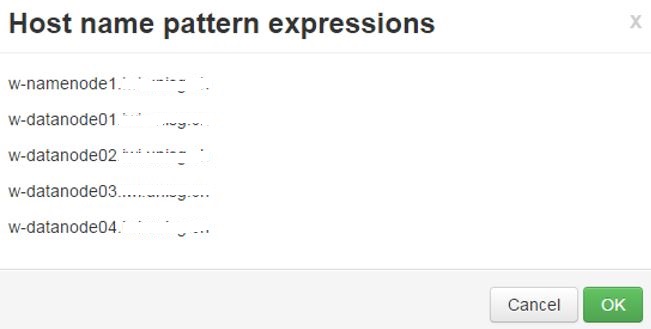
    (This is a print screen from one of my earlier cluster installations)Private key has to be defined and SSH User Account is by default root, but that will not work. In my case, I am using Ubuntu, so the user is ubuntu.
    ambari-new-host-install-options
    Now I can click Register and Confirm.
  3. In the Confirm Hosts step, Ambari server connects to the new node using SSH, it registers the new node to the cluster and installs Ambari Agent in order to keep control over it.Registering phase:
    ambari-new-host-registering-status
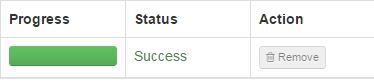
    New node has been registered successfully:
    ambari-new-host-success-status
    If anything else but this message is shown, click on the link to check the results. The list of checks performed is shown and everything should be in order before continuing (Earlier versions had a problem if ntpd or snappy was not installed/started, for example).
    ambari-new-host-check-passed
    All good in the hood here so I can continue with the installation.
  4. In step Assign Slaves and Clients I define my node to be a DataNode and has a NodeManager installed as well (if you are running Apache Storm, Supervisor is also an option).
    ambari-new-host-assign-slaves-clientsClick next.
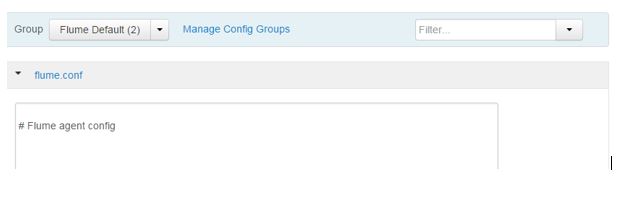
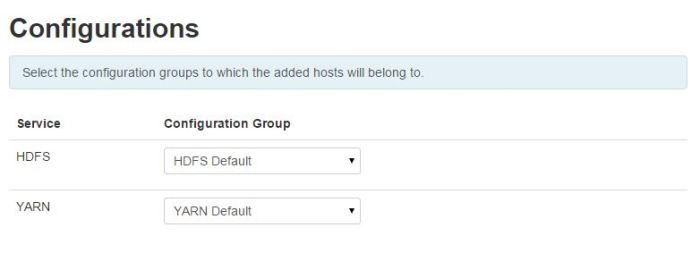
  5. In step Configurations, there is not much to do, unless you operate with more than one Configuration Group.
    ambari-new-host-configurationsClick Next.
  6. In step Review, one can just doublecheck if everything is as planned.
    Click deploy if everything is as it should be.
  7. Step Install, Start and Test is the last step. After everything is installed, new DataNode has joined the cluster.Here is how this should look like:
    ambari-new-host-install-successClick Next.
  8. Final step – Summary – gives a status update.ambari-new-host-summary
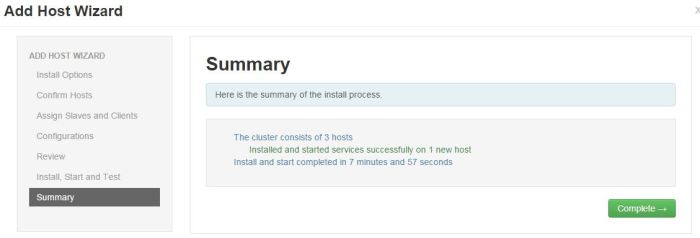
Click on Complete and list of installed Hosts will load.

Installing Apache Spark 1.6.x on a multinode cluster

I am running a HDP 2.3.4 multinode cluster with Ubuntu Trusty 14.04 on all my nodes. The Spark in this post is installed on my client node. My cluster has HDFS and YARN, among other services. All were installed from Ambari. This is not the case for Apache Spark 1.6, because Hortonworks does not offer Spark 1.6 on HDP 2.3.4

The documentation on Spark version 1.6 is here.

My post on setting up Apache Spark 2.0.0.

Prerequisities

Java

Update and upgrade the system and install Java

sudo add-apt-repository ppa:openjdk-r/ppa
sudo apt-get update
sudo apt-get install openjdk-8-jdk -y

Add JAVA_HOME in the system variables file

sudo vi /etc/environment
export JAVA_HOME=/usr/lib/jvm/java-8-openjdk-amd64

Spark user

Create user spark and add it to group hadoop

sudo adduser spark
sudo usermod -a -G hadoop spark

HDFS home directory for user spark

Create spark’s user folder in HDFS

sudo -u hdfs hadoop fs -mkdir -p /user/spark
sudo -u hdfs hadoop fs -chown -R spark:hdfs /user/spark

Spark installation and configuration

Install Spark

Create directory where spark directory is going to reside. Hortonworks installs its services under /usr/hdp. I am following their lead so I am installing all Apache services under /usr/apache. Create the directory and step into it.

sudo mkdir /usr/apache
cd /usr/apache

Download Spark 1.6.0 from https://spark.apache.org/downloads.html. I have Hadoop 2.7.1, version 2.6 does the trick.

sudo wget http://d3kbcqa49mib13.cloudfront.net/spark-1.6.0-bin-hadoop2.6.tgz

Unpack the tar file

sudo tar -xvzf spark-1.6.0-bin-hadoop2.6.tgz

Remove the tar file after it has been unpacked

sudo rm spark-1.6.0-bin-hadoop2.6.tgz

Change the ownership of the folder and its elements

sudo chown -R spark:spark spark-1.6.0-bin-hadoop2.6

Update system variables

Step into the spark 1.6.0 directory and run pwd to get full path

cd spark-1.6.0-bin-hadoop2.6
pwd

Update the system environment file by adding SPARK_HOME and adding Spark_HOME/bin to the PATH

sudo vi /etc/environment

export SPARK_HOME=/usr/apache/spark-1.6.0-bin-hadoop2.6

At the end of PATH add

${SPARK_HOME}/bin

Refresh the system environments

source /etc/environment

Change the owner of $SPARK_HOME to spark

sudo chown -R spark:spark $SPARK_HOME

Log and pid directories

Create log and pid directories

sudo mkdir /var/log/spark
sudo chown spark:spark /var/log/spark
sudo -u spark mkdir $SPARK_HOME/run

Spark configuration files

Hive configuration

sudo -u spark vi $SPARK_HOME/conf/hive-site.xml
<configuration>
<property>
<name>hive.metastore.uris</name>
<!--Make sure that <value> points to the Hive Metastore URI in your cluster -->
<value>thrift://hive-server:9083</value>
<description>URI for client to contact metastore server</description>
</property>
</configuration>

Spark environment file

Create a new file in under $SPARK_HOME/conf

sudo vi conf/spark-env.sh

Add the following lines and adjust aaccordingly.

export SPARK_LOG_DIR=/var/log/spark
export SPARK_PID_DIR=${SPARK_HOME}/run
export HADOOP_HOME=${HADOOP_HOME:-/usr/hdp/current/hadoop-client}
export HADOOP_CONF_DIR=${HADOOP_CONF_DIR:-/usr/hdp/current/hadoop-client/conf}
export JAVA_HOME=/usr/lib/jvm/java-8-openjdk-amd64
export SPARK_SUBMIT_OPTIONS="--jars ${SPARK_HOME}/lib/spark-csv_2.10-1.4.0.jar"

The last line serves as an example how to add external libreries to Spark. This particular package is quite common and is advised to install it. The package can be downloaded from this site.

Spark default file

Fetch HDP version

hdp-select status hadoop-client | awk '{print $3;}'

Example output

2.3.4.0-3485

Create spark-defaults.conf file in $SPARK_HOME/conf

sudo -u spark vi conf/spark-defaults.conf

Add the following and adjust accordingly (some properties belong to Spark History Server whose configuration is explained in the post in the link below)

spark.driver.extraJavaOptions -Dhdp.version=2.3.4.0-3485
spark.yarn.am.extraJavaOptions -Dhdp.version=2.3.4.0-3485
spark.eventLog.dir hdfs:///spark-history
spark.eventLog.enabled true
spark.history.fs.logDirectory hdfs:///spark-history
spark.history.provider org.apache.spark.deploy.history.FsHistoryProvider
spark.history.ui.port 18080

spark.history.kerberos.keytab none
spark.history.kerberos.principal none

spark.yarn.containerLauncherMaxThreads 25
spark.yarn.driver.memoryOverhead 384
spark.yarn.executor.memoryOverhead 384
spark.yarn.historyServer.address spark-server:18080
spark.yarn.max.executor.failures 3
spark.yarn.preserve.staging.files false
spark.yarn.queue default
spark.yarn.scheduler.heartbeat.interval-ms 5000
spark.yarn.submit.file.replication 3

spark.jars.packages com.databricks:spark-csv_2.10:1.4.0

spark.io.compression.codec lzf

spark.blockManager.port 38000
spark.broadcast.port 38001
spark.driver.port 38002
spark.executor.port 38003
spark.fileserver.port 38004
spark.replClassServer.port 38005

The ports are defined in this configuration file. If they are not, then Spark assigns random ports. More on ports and assigning them in Spark can be found here.

JAVA OPTS

Create java-opts file in $SPARK_HOME/conf and add your HDP version

sudo -u spark vi conf/java-opts

-Dhdp.version=2.4.0.0-169

Fixing links in Ubuntu

Since the Hadoop distribution is Hortonworks and Spark is Apache’s, some workaround is in place. Remove the default link and create new ones

sudo rm /usr/hdp/current/spark-client
sudo ln -s /usr/apache/spark-1.6.0-bin-hadoop2.6 /usr/hdp/current/spark-client
sudo ln -s /usr/hdp/current/spark-client/bin/sparkR /usr/bin/sparkR

Spark 1.6.0 is now ready.

How Spark History Server is configured and brought to life is explained here.

Installing Flume on Hortonworks cluster using Ambari

Add Flume in Ambari

  1. Click on Aded Service from the Ambari interface.
    flume-add service
  2. Flume service available in HDP is 1.5.2. Choose this service to be installed.
    flume-available version
  3. Pick where to install the Flume service. In this case, Flume is added to the namenode. The services can be moved to another node by using Ambari.
    flume-choose node
  4. In step Customize Services, Flume agent can be configured. This can be done after the service is installed. For now, let it be empty.
    flume-agent config
  5. In step Review, click on Deploy
    flume-deploy
  6. After the install, the service is started and tested. If everything goes well, the green progress bar shows up
    flume-install start and test
  7. The summary warns you that some services would have to be restarted so that Flume can function properly. This is a generic message. In case of installing only Flume, no restart of existing services is needed.
    flume-summary

Work in Linux

  1. User flume is added automatically by Ambari and it belongs to group hadoop.
    flume-linux group

Work in HDFS

  1. In order for user flume to work properly on HDFS, flume folder has to be created under /user in HDFS. For example, in case of deleting files in HDFS as user flume, deleted files are moved to /user/flume.Create /user/flume in HDFS.
    sudo -u hdfs hadoop fs -mkdir /user/flume

    Give ownership to user flume.

    sudo -u hdfs hadoop fs -chown flume /user/flume

    Give read, write and execute to flume and flume’s HDFS group – hdfs.

    sudo -u flume hadoop fs -chmod 770 /user/flume


Installing git and maven on Ubuntu

git

Installing git is very straight forward:

  1. Update the system
    sudo apt-get update -y && sudo apt-get upgrade -y
  2. Install git
    sudo apt-get install git

maven

Maven can be installed by using apt-get. Here, the manual way of doing it is described. Ubuntu 14.04 Trusty installs maven 3.0.5 and for building Zeppelin maven 3.1.0 or higher version is required.

In this case, maven is installed under /usr/apache. Reason for that is Hortonworks’ Hadoop installation is under /usr as well – /usr/hdp.

  1. Go on maven’s website and copy the link to the last stable version.https://maven.apache.org/download.cgi
  2. Go to the folder where maven will be installed.
    cd /usr/apache
  3. Download the file.
    sudo wget http://mirror.switch.ch/mirror/apache/dist/maven/maven-3/3.3.9/binaries/apache-maven-3.3.9-bin.tar.gz
  4. Unpack the file.
    sudo tar xzvf apache-maven-3.3.9-bin.tar.gz
  5. Update the global system environment variables.
    sudo vi /etc/environment
    export M2_HOME=/usr/apache/apache-maven-3.3.9
    export M2=$M2_HOME/bin
  6. Add maven’s bin folder to the PATH and save and exit the file.

    /usr/apache/apache-maven-3.3.9/bin

  7. Source the file.
    source /etc/environment
  8. Test if maven is properly installed.
    mvn -v

maven-version

Installing R on Hadoop cluster to run sparkR

The environment

Ubuntu 14.04 Trusty is the operating system. Hortonworks Hadoop distribution is used to install the multinode cluster.

The following process of installation has been successful for the following versions:

  • Spark 1.4.1
  • Spark 1.5.2
  • Spark 1.6.0

Prerequisities

This post assumes Spark is already installed on the system. How this can be done is explained in one of my posts here.

Setting up sparkR

If command sparkR ($SPARK_HOME/bin/sparkR) is run right after Spark installation is complete, the following error is returned:

env: R: No such file or directory

R packages have to be installed on all nodes in order for sparkR to work properly. Spark 1.6 Technical Preview on Hortonworks website gives us the link on how to set up R on Linux (Installing R on Linux). I experienced the process to be different.

Again, this process should be done on all nodes.

  1. The Ubuntu archives on CRAN are signed with the key of “Michael Rutter marutter@gmail.com” with key ID E084DAB9 (link)
    sudo apt-key adv --keyserver keyserver.ubuntu.com --recv-keys E084DAB9
  2. Now add the key to apt.
    gpg -a --export E084DAB9 | sudo apt-key add -
  3. Fetch Linux codename
    LVERSION=`lsb_release -c | cut -c 11-`

    In this case, it is trusty.

  4. From Cran – Mirrors or CRAN Mirrors US, find a suitable CRAN mirror and use it in the next step. In this case, a CRAN mirror from Austria is used – cran.wu.ac.at.
  5. Append the repository to the system’s sources.list file
    echo deb https://cran.wu.ac.at/bin/linux/ubuntu $LVERSION/ | sudo tee -a /etc/apt/sources.list
    

    The line added to the sources.list should look something like this:

    deb https://cran.wu.ac.at/bin/linux/ubuntu trusty/

  6. Update the system
    sudo apt-get update
  7. Install r-base package
    sudo apt-get install r-base -y
  8. Install r-base-dev package
    sudo apt-get install r-base-dev -y
  9. In order to avoid the following warn when Spark service is started:

    WARN shortcircuit.DomainSocketFactory: The short-circuit local reads feature cannot be used because libhadoop cannot be loaded.

    Add the following export to the system environment file:

    export LD_LIBRARY_PATH=/usr/hdp/current/hadoop-client/lib/native
  10. Test the installation by starting R
    R

    Something like this should show up and R should start.

    R version 3.2.3 (2015-12-10) — “Wooden Christmas-Tree”

  11. Exit R.
    q()

R is now installed on the first node. Steps 1 to 7 should be repeated on all nodes in the cluster.

Testing sparkR

If R is installed on all nodes (I haven’t mentioned that yet in this post), we can test it from the node where Spark client is installed:

cd $SPARK_HOME
./bin/sparkR

Hello message from Spark invites the user to the sparkR environment.

sparkR-hello-window

Output when starting SparkR

R version 3.2.3 (2015-12-10) — “Wooden Christmas-Tree”
Copyright (C) 2015 The R Foundation for Statistical Computing
Platform: x86_64-pc-linux-gnu (64-bit)

R is free software and comes with ABSOLUTELY NO WARRANTY.
You are welcome to redistribute it under certain conditions.
Type ‘license()’ or ‘licence()’ for distribution details.

Natural language support but running in an English locale

R is a collaborative project with many contributors.
Type ‘contributors()’ for more information and
‘citation()’ on how to cite R or R packages in publications.

Type ‘demo()’ for some demos, ‘help()’ for on-line help, or
‘help.start()’ for an HTML browser interface to help.
Type ‘q()’ to quit R.

Launching java with spark-submit command /usr/hdp/2.3.4.0-3485/spark/bin/spark-submit “sparkr-shell” /tmp/RtmpN1gWPL/backend_port18f039dadb86
16/02/22 22:12:40 WARN SparkConf: The configuration key ‘spark.yarn.applicationMaster.waitTries’ has been deprecated as of Spark 1.3 and and may be removed in the future. Please use the new key ‘spark.yarn.am.waitTime’ instead.
16/02/22 22:12:41 WARN SparkConf: The configuration key ‘spark.yarn.applicationMaster.waitTries’ has been deprecated as of Spark 1.3 and and may be removed in the future. Please use the new key ‘spark.yarn.am.waitTime’ instead.
16/02/22 22:12:41 INFO SparkContext: Running Spark version 1.5.2
16/02/22 22:12:41 WARN NativeCodeLoader: Unable to load native-hadoop library for your platform… using builtin-java classes where applicable
16/02/22 22:12:41 WARN SparkConf: The configuration key ‘spark.yarn.applicationMaster.waitTries’ has been deprecated as of Spark 1.3 and and may be removed in the future. Please use the new key ‘spark.yarn.am.waitTime’ instead.
16/02/22 22:12:41 INFO SecurityManager: Changing view acls to: ubuntu
16/02/22 22:12:41 INFO SecurityManager: Changing modify acls to: ubuntu
16/02/22 22:12:41 INFO SecurityManager: SecurityManager: authentication disabled; ui acls disabled; users with view permissions: Set(ubuntu); users with modify permissions: Set(ubuntu)
16/02/22 22:12:42 INFO Slf4jLogger: Slf4jLogger started
16/02/22 22:12:42 INFO Remoting: Starting remoting
16/02/22 22:12:42 INFO Remoting: Remoting started; listening on addresses :[akka.tcp://sparkDriver@10.x.xxx.xxx:59112]
16/02/22 22:12:42 INFO Utils: Successfully started service ‘sparkDriver’ on port 59112.
16/02/22 22:12:42 INFO SparkEnv: Registering MapOutputTracker
16/02/22 22:12:42 WARN SparkConf: The configuration key ‘spark.yarn.applicationMaster.waitTries’ has been deprecated as of Spark 1.3 and and may be removed in the future. Please use the new key ‘spark.yarn.am.waitTime’ instead.
16/02/22 22:12:42 INFO SparkEnv: Registering BlockManagerMaster
16/02/22 22:12:42 INFO DiskBlockManager: Created local directory at /tmp/blockmgr-aeca25e3-dc7e-4750-95c6-9a21c6bc60fd
16/02/22 22:12:42 INFO MemoryStore: MemoryStore started with capacity 530.0 MB
16/02/22 22:12:42 WARN SparkConf: The configuration key ‘spark.yarn.applicationMaster.waitTries’ has been deprecated as of Spark 1.3 and and may be removed in the future. Please use the new key ‘spark.yarn.am.waitTime’ instead.
16/02/22 22:12:42 INFO HttpFileServer: HTTP File server directory is /tmp/spark-009d52a3-de7e-4fa1-bea3-97f3ef34ebbe/httpd-c9182234-dec7-438d-8636-b77930ed5f62
16/02/22 22:12:42 INFO HttpServer: Starting HTTP Server
16/02/22 22:12:42 INFO Server: jetty-8.y.z-SNAPSHOT
16/02/22 22:12:42 INFO AbstractConnector: Started SocketConnector@0.0.0.0:51091
16/02/22 22:12:42 INFO Utils: Successfully started service ‘HTTP file server’ on port 51091.
16/02/22 22:12:42 INFO SparkEnv: Registering OutputCommitCoordinator
16/02/22 22:12:43 INFO Server: jetty-8.y.z-SNAPSHOT
16/02/22 22:12:43 INFO AbstractConnector: Started SelectChannelConnector@0.0.0.0:4040
16/02/22 22:12:43 INFO Utils: Successfully started service ‘SparkUI’ on port 4040.
16/02/22 22:12:43 INFO SparkUI: Started SparkUI at http://10.x.x.108:4040
16/02/22 22:12:43 WARN SparkConf: The configuration key ‘spark.yarn.applicationMaster.waitTries’ has been deprecated as of Spark 1.3 and and may be removed in the future. Please use the new key ‘spark.yarn.am.waitTime’ instead.
16/02/22 22:12:43 WARN MetricsSystem: Using default name DAGScheduler for source because spark.app.id is not set.
16/02/22 22:12:43 INFO Executor: Starting executor ID driver on host localhost
16/02/22 22:12:43 INFO Utils: Successfully started service ‘org.apache.spark.network.netty.NettyBlockTransferService’ on port 41193.
16/02/22 22:12:43 INFO NettyBlockTransferService: Server created on 41193
16/02/22 22:12:43 INFO BlockManagerMaster: Trying to register BlockManager
16/02/22 22:12:43 INFO BlockManagerMasterEndpoint: Registering block manager localhost:41193 with 530.0 MB RAM, BlockManagerId(driver, localhost, 41193)
16/02/22 22:12:43 INFO BlockManagerMaster: Registered BlockManager
16/02/22 22:12:43 WARN SparkConf: The configuration key ‘spark.yarn.applicationMaster.waitTries’ has been deprecated as of Spark 1.3 and and may be removed in the future. Please use the new key ‘spark.yarn.am.waitTime’ instead.

Welcome to
____ __
/ __/__ ___ _____/ /__
_\ \/ _ \/ _ `/ __/ ‘_/
/___/ .__/\_,_/_/ /_/\_\ version 1.5.2
/_/
Spark context is available as sc, SQL context is available as sqlContext
>


If it happens you do not get the prompt displayed:

16/02/22 22:52:12 INFO ShutdownHookManager: Shutdown hook called
16/02/22 22:52:12 INFO ShutdownHookManager: Deleting directory /tmp/spark-009d52a3-de7e-4fa1-bea3-97f3ef34ebbe

Just press Enter.


Possible errors

No public key

W: GPG error: https://cran.wu.ac.at trusty/ Release: The following signatures couldn't be verified because the public key is not available: NO_PUBKEY 51716619E084DAB9

Step 1 was not performed.

Hash Sum mismatch

When updating Ubuntu the following error message shows up:

Hash Sum mismatch

Solution:

sudo rm -rf /var/lib/apt/lists/*
sudo apt-get clean
sudo apt-get update

Resources

1 – Spark 1.6 Technical Preview

2- Installing R on Linux

3 – CRAN – Mirrors

4 – CRAN Secure APT

Installing Spark on Hortonworks cluster using Ambari

The environment

Ubuntu Trusty 14.04. Ambari is used to install the cluster. MySql is used for storing Ambari’s metadata.
Spark is installed on a client node.


Note!

My experience with administrating Spark from Ambari has made me install Spark manually, not from Ambari and not by using Hortonworks packages. I install Apache Spark manually on a client node – described here.

Some reasons for that are:

  • New Spark version available every quarter – Hortonworks does not keep up
  • Possibility of running different Spark version on the same client
  • Better control over configuration files
  • Custom definition of Spark parameters for running multiple Spark context on the same client node (more in this post).


Installation process in Ambari

Hortonworks distribution installed using Ambari. Hortonworks version 2.3.4.
Services installed first: HDFS, MapReduce, YARN, Ambari Metrics, Zookeeper – I prefer to install these first in order to test if the bare minimum is up and running.

In the next step, Hive, Tez and Pig are installed.

After the successful installation, Spark is installed.

Spark versions

Now, Spark is installed. Hortonworks distribution 2.3.4 offers Spark 1.4.1 from the Choose Services menu:

ambari-spark-version

Running command spark-shell from the spark server reveals that 1.5.2 was installed:

spark-152-version-logo
and
sc-version

Spark’s HOME

Spark’s home directory ($SPARK_HOME) is /usr/hdp/current/spark-client. It is smart to export $SPARK_HOME since it is refered to in services that build on top of Spark.
Spark’s conf directory ($SPARK_CONF_DIR) is /usr/hdp/current/spark-client/conf.

Folder current has nothing but links to the Hortonworks version installed. This means that /usr/hdp/current/spark-client is linked to /usr/hdp/2.3.4.0-3485/spark/.

Comments on the installation

Spark installation from Ambari has, among other things, created a linux user spark and a directory on HDFS – /user/spark.

Spark commands, that were installed, are the following:
spark-class, spark-shell, spark-sql, spark-submit – these can be called from anywhere, since they are linked in /usr/bin.
Other spark commands not linked to the /usr/bin but can be executed from $SPARK_HOME/bin are beeline, pyspark, sparkR.

Connection to Hive

In the SPARK_CONF_DIR, hive-site.xml file can be found. The file has the following content:

<configuration>
  <property>
    <name>hive.metastore.uris</name>
    <value>thrift://hive-server:9083</value>
  </property>
</configuration>

With this propery, Spark connects to Hive. here are two lines from the output when command spark-shell is executed:

16/02/22 13:52:37 INFO metastore: Trying to connect to metastore with URI thrift://hive-server:9083
16/02/22 13:52:37 INFO metastore: Connected to metastore.

Logs

Spark’s log files are by default in /var/log/spark. This can be changed in Ambari: Spark-> Configs -> Advanced spark-env for property spark_log_dir.

Running Spark commands

Examples on how to execute the Spark commands (taken from Hortonworks Spark 1.6 Technical Preview).
These should be run as spark user from $SPARK_HOME.

spark-shell

spark-shell --master yarn-client --driver-memory 512m --executor-memory 512m

spark-submit

./bin/spark-submit --class org.apache.spark.examples.SparkPi --master yarn-client --num-executors 3 --driver-memory 512m --executor-memory 512m --executor-cores 1 lib/spark-examples*.jar 10

sparkR

running sparkR ($SPARK_HOME/bin/sparkR) returns the following:

env: R: No such file or directory

R is not installed, yet. How to install R environment is described here.

Resources

Spark 1.6 Technical Preview