Druid is a “fast column-oriented distributed data store”, according to the description in Ambari. It is a new service, added in HDP 2.6. The service is Technical Preview and the version offered is 0.9.2. Druid’s website is druid.io.
!!! Hortonworks Data Platform 2.6 is needed in order to install and use Druid !!!
Hortonworks has a very intriguing three-part series on ultra fast analytics with Hive and Druid. The first blog post can be found here.
This blog post describes how Druid is added to the HDP 2.6 stack with Ambari. The documentation I used is here. According to my experience, it does not hold water. I had to make some adjustment in order to start all Druid services.
Requirements
- Zookeeper: Druid requires installation of Zookeeper. This service is already installed on my cluster.
- Deep storage: deep storage layer for Druid in HDP can either be HDFS or S3. Parameter “druid.storage.type” is used to define this. Installation default is HDFS.
- Metadata storage: for holding information about Druid segments and tasks. MySql is my metadata storage of choice.
- Batch execution engine: resource manager is YARN, execution engine is MapReduce2. Druid hadoop index tasks use MapReduce jobs for distributed ingestion of data.
All these requirements are taken care of in Ambari, most of them with a sufficient default value.
Services within Druid
- Broker – interface between users and Druid’s historical and realtime nodes.
- Overlord – maintain a task queue that consists of user-submitted tasks.
- Coordinator – serve to assign segments to historical nodes, handle data replication, and to ensure that segments are distributed evenly across the historical nodes.
- Druid Router – serve as a mechanism to route queries to multiple broker nodes.
- Druid Superset – if you know Superset, you know Druid Superset – data visualization tool.
Pre-work in metadata storage
As mentioned, my metadata storage is MySql. There are some objects that have to be created manually for the Druid installation to go through.
Log in to MySql as root.
Create druid database
CREATE DATABASE druid DEFAULT CHARACTER SET utf8;
CREATE USER 'druid'@'%' IDENTIFIED BY 'druid';
GRANT ALL PRIVILEGES ON druid.* TO 'druid'@'%';
FLUSH PRIVILEGES;
Create superset database
The superset objects in the database have to be created even though the documentation does not mention this. The installation will not go through unless it can connect to superset database to create tables in superset schema.
CREATE DATABASE superset DEFAULT CHARACTER SET utf8;
CREATE USER 'superset'@'%' IDENTIFIED BY 'druid';
GRANT ALL PRIVILEGES ON superset.* TO 'superset'@'%';
FLUSH PRIVILEGES;
Adding service
In Ambari, click on Add Service and check Druid service.

In the next step, you are asked to define which Druid service is going to be installed on which node in the cluster. Remember, you can always move/add services.
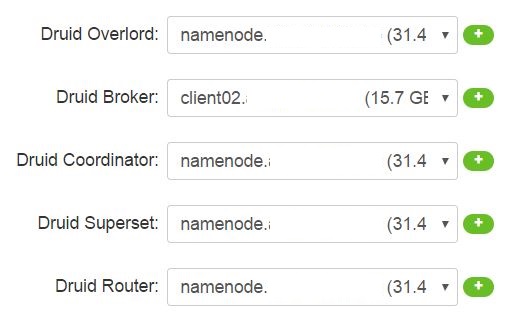
The Broker is on the Client node, since that service is the gateway to external world.
In the next step – Assigning Slaves and Clients – the following two needs to be defined where they will be installed:
- Druid Historical: Loads data segments.
- Druid MiddleManager: Runs Druid indexing tasks.
Generally you should select Druid Historical and Druid MiddleManager for multiple nodes. Both services are on namenode to begin with.
Next step are settings. There are some passwords and MySql server that needs to be defined. Secret key is also something one needs to define. A random string of characters would do the trick.
Be sure to create the objects in the MySql before you proceed with the installation.
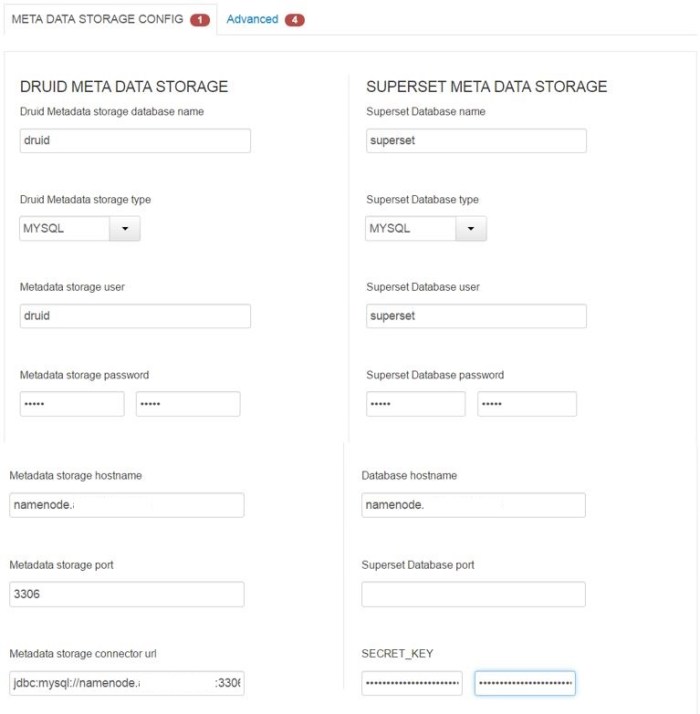
!!! Superset Database port should be 3306, just like Metadata storage port.
The advanced tab (picture above) is mostly for the superset parameters – entering name, email and password is needed to proceed with the installation. This is later on used in the visualization tool Superset.
Once you click OK, you are asked to doublecheck and change some recommended values. The following ones are related to Druid installation and should be checked to accept the recommended values.

In the Review step, check if everything is as it should be and click Deploy.
After the installation completes all Druid services should be up and running. If there is the need to restart any services, do so.
Tweaking MapReduce2
There is one detail not mentioned in Hortonworks documentation when Druid is installed. There are two parameters in MapReduce2 that have to be tweaked in order for Druid to successfully load data. Explanation is at the bottom.
The parameters are:
- mapreduce.map.java.opts
- mapreduce.reduce.java.opts
The following should be added at the end of the existing values:
-Duser.timezone=UTC -Dfile.encoding=UTF-8
How it looks in Ambari:


The service MapReduce2 should now be restarted.
Explanation
Various error messages occur in the Druid Console log files when the Druid job start to load the data. The error messages vary depending on the data, but generally, they do not provide any useful information.
From my experience, one error had a problem with the first line in a valid csv file, while in another example, the error was that no data can be indexed (code below).
Caused by: java.lang.RuntimeException: No buckets?? seems there is no data to index.
	at io.druid.indexer.IndexGeneratorJob.run(IndexGeneratorJob.java:176) ~[druid-indexing-hadoop-0.9.2.2.6.0.3-8.jar:0.9.2.2.6.0.3-8]
	at io.druid.indexer.JobHelper.runJobs(JobHelper.java:349) ~[druid-indexing-hadoop-0.9.2.2.6.0.3-8.jar:0.9.2.2.6.0.3-8]
	at io.druid.indexer.HadoopDruidIndexerJob.run(HadoopDruidIndexerJob.java:94) ~[druid-indexing-hadoop-0.9.2.2.6.0.3-8.jar:0.9.2.2.6.0.3-8]
	at io.druid.indexing.common.task.HadoopIndexTask$HadoopIndexGeneratorInnerProcessing.runTask(HadoopIndexTask.java:261) ~[druid-indexing-service-0.9.2.2.6.0.3-8.jar:0.9.2.2.6.0.3-8]
	at sun.reflect.NativeMethodAccessorImpl.invoke0(Native Method) ~[?:1.8.0_111]
	at sun.reflect.NativeMethodAccessorImpl.invoke(NativeMethodAccessorImpl.java:62) ~[?:1.8.0_111]
	at sun.reflect.DelegatingMethodAccessorImpl.invoke(DelegatingMethodAccessorImpl.java:43) ~[?:1.8.0_111]
	at java.lang.reflect.Method.invoke(Method.java:498) ~[?:1.8.0_111]
	at io.druid.indexing.common.task.HadoopTask.invokeForeignLoader(HadoopTask.java:201) ~[druid-indexing-service-0.9.2.2.6.0.3-8.jar:0.9.2.2.6.0.3-8]
	... 7 more